Pages

Showing posts with label icing sugar. Show all posts

10.02.2011

ooey gooey.


My sister Jen isn't exactly what you'd call a "Suzy Homemaker". Her idea of cleaning her bedroom is usually throwing everything into her laundry hamper, and her idea of a good meal is generally filet-o-fish. It's funny because as far as sisters go, we are VERY different. She's blonde, I'm a brunette. She's a vegetarian...I love me some meat. Jen reads literary masterpieces...I read cookbooks. My favourite past time is strolling the aisles of the grocery store (don't judge)...Jen avoids cooking JUST to avoid the grocery store. And in the kitchen...I make cookies...Jen eats my cookies! Love you Jen!!!
I do have to give her a little credit though. There are a couple things that Jen makes really well, and this is one of them. I actually had to steel this recipe from her! Jen got this recipe for buttertarts from the family of a client she used to care for, and boy are they good! They're the type of dessert that looks like you've spent the whole day in the kitchen when really...it's been an hour! I used store made tart shells, but if you like to make your own pastry, more power to you. Fill them with raisins, pecans, walnuts, or just leave them plain. Go ahead...impress your friends and family!


Jen's Buttertarts

- (2) eggs
- (1) cup of packed brown sugar
- (1/2) cup of corn syrup
- (1) tbsp vinegar
- (1/2) cup butter, softened
- (1/2) cup of raisins (optional)
- (1/2) cup of chopped walnuts or pecans
- (1) tsp vanilla
- (~18) tart shells (about 1 1/2 boxes)


Preheat your oven to 425 degrees F. Beat eggs slightly in a medium sized bowl. Beat in the sugar, corn syrup, vinegar, vanilla and butter.


Whether you're using pecans, walnuts, raisins (or a combination), stir them into the buttery mixture. If you're leaving them plain, you're ready to fill your tart shells!


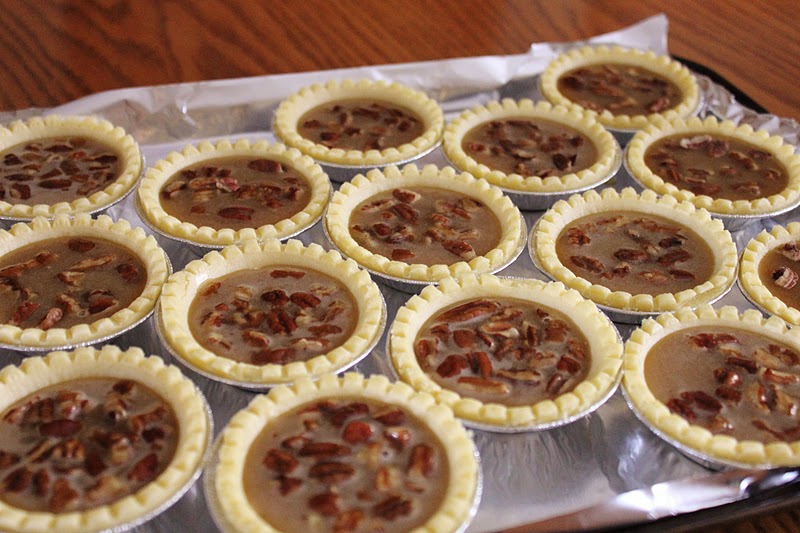
Lay your tart shells out on a baking sheet lined with aluminum foil. This way if your tarts overflow ever so slightly, you won't be cleaning up a sticky mess! If you arrange the shells strategically, you should be able to fit about 18 tarts on your baking sheet. Spoon your butter mixture into the shells, filling them about 3/4's of the way (as seen in the pictures below). If you want to make the entire two boxes of shells, fill the shells with slightly less filling to stretch it out.


Slide your baking sheet into the oven and bake for about 10 to 15 minutes, until just golden brown. Keep an eye on them as each oven is different and your tarts can turn from pale to nicely tanned fairly quickly.


Let the tarts cool and then serve. Your tarts will stay fresh for quite a few days and can also be frozen for another day. Enjoy!

4.27.2011

lovin' lemon.

 
There's something about spring that reminds me of lemons. I'm not sure if it's because of the yellow daffodils that are popping up everywhere this time of the year, or whether it's the lemony smell throughout the house as everyone begins their spring cleaning, but lemons and spring just seem to go together. Lemon is one of my favourite flavours!  I'm not big into really sweet desserts, so the tartness of lemons cuts the sweetness just perfectly and adds a fresh citrusy flavour that I've always loved. I'll openly admit to eating the E.D. Smith lemon spread right out of the jar.
This past week I started to page through some of my recipe books looking for a snack to bring to our family Easter get-together. My Opa (Dutch for grandfather) recently moved into a long-term care facility as his health is not what it once was. I knew he'd be coming over for dinner, so I wanted to make something a little special for him. His ultimate favourite is lemon-meringue pie, but I'm not quite ready to tackle that recipe just yet. I thought some lemon squares would be a good compromise.
I've experimented with other recipes for lemon squares before, but I was looking for the ultimate recipe. One that combines a good shortbread crust with a filling that is both gooey and super lemony. My search led me to a fellow bloggers site. This recipe for lemon squares is from Moira at Who Wants Seconds and in my opinion, is worthy of the "ultimate" title...I think my Opa would agree too :)
 
 
The "Ultimate" Lemon Squares

Crust
- (2) cups of all-purpose flour
- (1/2) cup of sifted icing sugar (Confectioner's Sugar)
- (1) cup of butter (frozen)

Filling
- (4) eggs, beaten
- (2) cups of sugar
- (1/3) cup of lemon juice (freshly squeezed tastes best)
- (2) tsp lemon zest
- (1/4) cup of all-purpose flour
- (1/2) tsp baking powder
- icing sugar for dusting


FOR THE CRUST:
Adjust oven rack to the middle position; heat oven to 350 degrees F. Lightly butter a 9 x 13-inch baking dish and line the base and sides of the dish with parchment paper. Note that the sides of the dish in this picture aren't fully covered with the parchment paper, however, if you can cover the sides completely, the squares will come out of the dish MUCH easier.


Whisk the dry ingredients together in a large bowl. Grate the frozen butter (using the large holes of a box grater) into the dry mixture. 


Toss the butter pieces to coat, then rub the pieces between your fingers for a couple minutes, until the flour turns coarse and the mixture holds together when you squeeze it. 


Pour the mixture into the lined pan and press firmly with your fingers to form an even crust. Bake for 20-25 minutes, or until golden brown.


FOR THE FILLING:
Whisk eggs, sugar, flour and baking powder together in a medium bowl. Add the lemon juice and zest and stir well. Pour mixture into the pan on top of the warm crust.


Bake for 20-25 minutes, or until the filling feels firm when touched lightly. Transfer the pan to a wire rack and cool for 30 minutes. Grasp the parchment and carefully lift the bars onto a cutting board. Cut into serving size squares or bars, wiping your knife clean between cuts if necessary. Sieve confectioners' sugar over bars and serve.