Pages

4.27.2011

lovin' lemon.

 
There's something about spring that reminds me of lemons. I'm not sure if it's because of the yellow daffodils that are popping up everywhere this time of the year, or whether it's the lemony smell throughout the house as everyone begins their spring cleaning, but lemons and spring just seem to go together. Lemon is one of my favourite flavours!  I'm not big into really sweet desserts, so the tartness of lemons cuts the sweetness just perfectly and adds a fresh citrusy flavour that I've always loved. I'll openly admit to eating the E.D. Smith lemon spread right out of the jar.
This past week I started to page through some of my recipe books looking for a snack to bring to our family Easter get-together. My Opa (Dutch for grandfather) recently moved into a long-term care facility as his health is not what it once was. I knew he'd be coming over for dinner, so I wanted to make something a little special for him. His ultimate favourite is lemon-meringue pie, but I'm not quite ready to tackle that recipe just yet. I thought some lemon squares would be a good compromise.
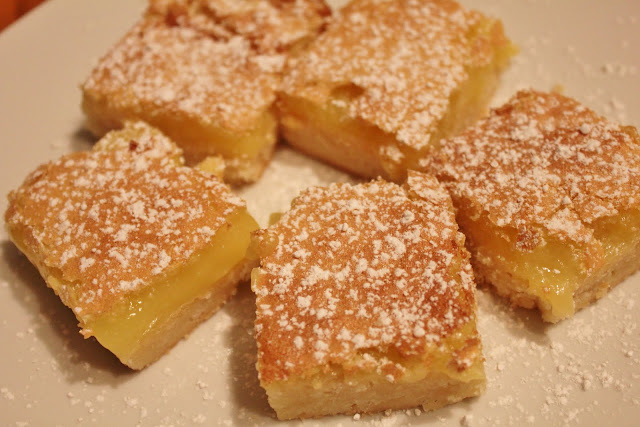
I've experimented with other recipes for lemon squares before, but I was looking for the ultimate recipe. One that combines a good shortbread crust with a filling that is both gooey and super lemony. My search led me to a fellow bloggers site. This recipe for lemon squares is from Moira at Who Wants Seconds and in my opinion, is worthy of the "ultimate" title...I think my Opa would agree too :)
 
 
The "Ultimate" Lemon Squares

Crust
- (2) cups of all-purpose flour
- (1/2) cup of sifted icing sugar (Confectioner's Sugar)
- (1) cup of butter (frozen)

Filling
- (4) eggs, beaten
- (2) cups of sugar
- (1/3) cup of lemon juice (freshly squeezed tastes best)
- (2) tsp lemon zest
- (1/4) cup of all-purpose flour
- (1/2) tsp baking powder
- icing sugar for dusting


FOR THE CRUST:
Adjust oven rack to the middle position; heat oven to 350 degrees F. Lightly butter a 9 x 13-inch baking dish and line the base and sides of the dish with parchment paper. Note that the sides of the dish in this picture aren't fully covered with the parchment paper, however, if you can cover the sides completely, the squares will come out of the dish MUCH easier.


Whisk the dry ingredients together in a large bowl. Grate the frozen butter (using the large holes of a box grater) into the dry mixture. 


Toss the butter pieces to coat, then rub the pieces between your fingers for a couple minutes, until the flour turns coarse and the mixture holds together when you squeeze it. 


Pour the mixture into the lined pan and press firmly with your fingers to form an even crust. Bake for 20-25 minutes, or until golden brown.


FOR THE FILLING:
Whisk eggs, sugar, flour and baking powder together in a medium bowl. Add the lemon juice and zest and stir well. Pour mixture into the pan on top of the warm crust.


Bake for 20-25 minutes, or until the filling feels firm when touched lightly. Transfer the pan to a wire rack and cool for 30 minutes. Grasp the parchment and carefully lift the bars onto a cutting board. Cut into serving size squares or bars, wiping your knife clean between cuts if necessary. Sieve confectioners' sugar over bars and serve.


4.17.2011

rockin' morrocan stew.


I recently received a request from a neighbour of mine to share a recipe with an ethnic flare. I racked my brain thinking of some of my favourites...red curry chicken, pad thai, chicken tikki marsala (all of which I'll eventually share with you), but I finally decided on one of my all time favourites...Rockin' Moroccan Stew. This is one of those recipes that has been passed on SO many times that I'm not even sure where it originally came from anymore. Regardless...it's amazing!
Rockin' Moroccan Stew is healthy and hearty and while it makes a great dish on a cool day, I could eat it anytime of the year. It's got the earthy taste of curry and cumin, texture from the chickpeas and sweet potatoes and the fresh taste of cilantro. My favourite part though...the peanut butter! Don't be scared of this crazy flavour combination...when it all comes together...it's perfection.
This particular recipe is completely vegetarian, however, I've known some meat-eater friends of mine have made it with cooked, cubed chicken and have got great results too. Rockin' Moroccan is perfect served on it's own, it goes great on top of rice or couscous, or just shovel it in your mouth using some naan bread or pita. Anything works!


Rockin' Moroccan Stew
        (Serves 6)

- (2) tsp. olive oil
- (1) cup of chopped onion
- (1/2) cup of chopped celery
- (1/2) cup of chopped green pepper
- (1) clove of garlic, minced
- (3) cups of vegetable broth
- (3) cups of of peeled, cubed sweet potatoes
- (1) 28oz. can of diced tomatoes
- (1) 14oz. can of chick peas, drained and rinsed
- (1) tbsp. of lemon juice
- (2) tbsp. of grated ginger
- (1) tsp. cumin
- (1) tsp. curry powder
- (1) tsp. ground corriander
- (1) tsp. chili powder
- (1/2) tsp. salt
- (1/4) tsp. pepper
- (1/4) cup of raisins (optional)
- (2) tbsp. of peanut butter
- (2) tbsp. of chopped fresh cilantro

The easiest thing to do is to chop up all the veggies first. That way you can just toss everything in the pot at the right time.


Heat olive oil in a large saucepan or pot over medium to high heat. Add onions, celery, green pepper, and garlic. Cook and stir until vegetables begin to soften, about 3 minutes.


Add all remaining ingredients, except for the raisins, peanut butter and cilantro. Bring to a boil. Reduce heat to low and simmer, covered, for about 20 minutes or until the sweet potatoes begin to soften.


Stir in raisins (if you're using them), peanut butter and cilantro. Mix well. Simmer for 5 more minutes and serve. If you are making this stew in advance, leave out the final three ingredients until you plan on serving it. They can be added once you reheat the stew, and will need another 5 minutes to simmer.
Enjoy!


4.13.2011

chocolate chip cookies.


In my opinion, every food blog needs to have a good chocolate chip cookie recipe. It's a staple. And unfortunately (for my waist line) it's become a staple in our house as well. Once you've caught on to a great cookie recipe, it's really hard to go back to Mr. Christie, however good his cookies may be.
As with most of my recipes, this chocolate chip cookie recipe is an adaptation of several different recipes. Practice really does make perfect! These cookies are amazing right out of the oven (well to be fair, I'd wait a couple minutes...I don't need a Tim Horton's style law suit on my hands) and just as good a few days later. They have the perfect ratio of crunchy to flakey to chewy to gooey to all-around goodness. 
I tend to take my cookies out of the oven BEFORE they develop a good tan...while they're still slightly on the pale side. If you remove them from the oven at this point, but let them sit on the baking tray, they'll continue to cook throughout without getting too crispy on their tops and bottoms. These rules can apply to your summer sun-tanning as well :)
The nuts in this recipe are completely optional, so your cookies will taste great either way. Because the dough in this recipe is so versatile, feel free to experiment with other "add-ins" such as rolled oats, raisins, M&M's or butterscotch chips...remembering to keep the measurements the same.

Enjoy!


Chocolate Chip Cookies

- (1) cup of butter or margarine
- (1) cup of white sugar
- (1/2) cup of packed brown sugar
- (2) eggs
- (1) tbsp. vanilla
- (2 3/4) cups all-purpose flour
- (1) tsp. baking soda
- (1/2) tsp. salt
- (2) cups semi-sweet chocolate chips
- (1) cup of finely chopped walnuts or pecans (optional)


Preheat oven to 375 degrees F. In a bowl, beat together the butter and the two sugars until smooth. 


Beat in both the eggs and the vanilla. Set aside. 


In a separate bowl, whisk together the flour, baking soda and salt. Add the flour mixture to the butter mixture and stir until combined.


Stir in the chocolate chips, the nuts, or whatever "add-ins" you've decided to use.


Drop by the tablespoonful onto a baking sheet, approximately 2 inches apart. I normally line my baking sheet with aluminum foil, but it can also be lined with parchment paper or dropped directly onto a greased sheet. Another tip when forming the cookies is to "form" them as little as possible. Rolled dough balls and pressed dough often create very plain, uniform cookies. If you simply drop a rounded mound of dough onto your baking sheet, you will end up with cookies with great character!


Pop the cookies in the oven for approximately 10-12 minutes (it varies with each individual oven). Remember that if you remove the cookies before they get too brown, you will end up with a softer, chewier cookie. Remove from the oven and allow to cool right on the baking sheet. Remember...Caution...Hot!


4.08.2011

soul food.


There are certain recipes and dishes that just scream comfort food, and this is definitely one of them. I'm not sure if it's because it reminds me of my younger years and my mom cooking in the kitchen, or maybe it's the smell that infuses throughout the whole house when you're making this dish, or possibly it's just because they're soooo good!
My recent trip home to the Niagara Region in Ontario, Canada left me feeling a little nostalgic and craving some of the comfort foods reminiscent of "home". Joe and I stayed at my mom's house, and just as I anticipated, it only took a couple hours of settling in before everyone was asking me what I was making for dinner. Classic!
This recipe originally came from the Encyclopedia of Cooking, a cookbook that my mom inherited from my grandma about 25 years ago. The book no longer has a cover on it, half of the index is missing, and a number of the pages are permanently stuck together by a number of unidentified ingredients. This particular recipe is covered with ketchup and Worcestershire sauce which is just a testament to the number of times we've made...or possibly to how messy I am in the kitchen.
In general, pork back ribs are more meaty and tender than side ribs, but also quite a bit more expensive. I've made this recipe using both types, and they both taste great, but because side ribs are slightly tougher, they may require more time in the oven before they become tender.


Barbecue - Style  Spareribs
       (Serves 4 to 6)

- (4 to 5) lbs. of fresh or frozen pork spareribs
- (1) cup of ketchup
- (1/4) cup vinegar
- (1/4) cup Worcestershire sauce
- (1) tsp. salt
- (1) tsp. pepper
- (2) tsp. chili powder
- (1/4) tsp. cayenne pepper (add a little extra if you like them spicy)
- (1 or 2) small to medium onions, finely chopped
- (1 1/2) cups water

Preheat the oven to 350 degrees F.

When you buy ribs in the store, they will normally come in a pack with two racks of ribs. The first thing you'll want to do is cut each rack into smaller pieces. This can be done with either a good pair of kitchen scissors or a sharp knife. Cut the ribs into 3 to 4 bone sections, cutting right between two bones.


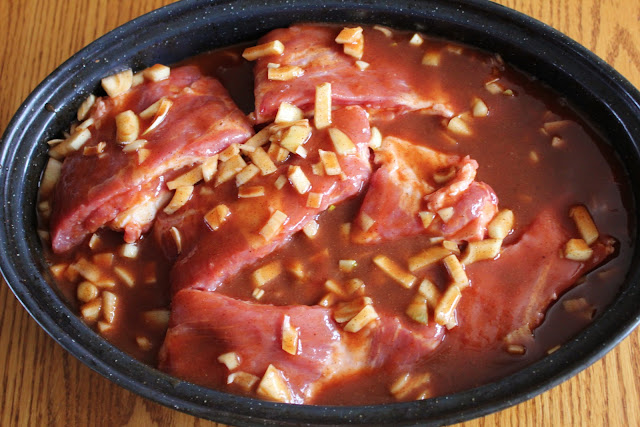
Arrange the ribs in a slightly deeper baking dish, preferably something with a lid. Don't worry if the ribs overlap, the sauce will cover all the ribs and they will still cook throughout.


In a separate bowl, add the rest of the ingredients and stir until combined. If you like your ribs a little spicier, doubling the cayenne pepper should give it a good kick.


Once the sauce is prepared, pour the entire bowl right over the ribs, making sure that all the ribs are completely covered.


Put the lid on your baking dish and pop it into the oven. If you don't have a lid, cover the dish completely with aluminum foil. Bake the ribs for approximately 2 hours, making sure to turn and baste the ribs a couple times while they're baking. You want to make sure the ribs stay moist and saucy. If your ribs are quite thick to begin with (or if you're cooking more than 5 lbs of ribs), they could take longer than 2 hours. Just keep an eye on them as they shouldn't be tough at all and should fall right off the bone. Remove the lid or aluminum foil for the last 30 minutes of baking.


This recipe ends of yielding a fair amount of extra sauce. Top your ribs with an extra scoopful of sauce and pour some on top of your rice or potatoes too....yum!